-
Use foveated streaming to bring immersive content to visionOS
Find out how foveated streaming delivers remotely rendered scenes to Apple Vision Pro in full fidelity. Explore how this framework combines native visionOS capabilities with third-party streaming technologies completely wirelessly, demonstrated using an OpenXR scene and NVIDIA CloudXR. Learn about the FoveatedStreaming framework, integration with the NVIDIA CloudXR SDK, and how dynamically foveated streaming provides benefits while still preserving privacy.
Chapters
- 0:00 - Introduction
- 4:08 - How Foveated Streaming works
- 4:46 - Set up the streaming endpoint
- 5:18 - Create a visionOS receiver app
- 8:02 - Integrate with the streaming endpoint
- 11:28 - Measure performance
- 11:56 - Enhance with visionOS features
- 13:56 - Next steps
Resources
- Analyzing the performance of a foveated streaming session
- Establishing foveated streaming sessions with Apple Vision Pro
- Streaming a CloudXR application to Apple Vision Pro with foveation
- Creating a foveated streaming client on visionOS
- Foveated Streaming
- StreamingSession: Streaming immersive content from a CloudXR™ application to visionOS and iOS
Related Videos
WWDC26
-
Search this video…
Hi I'm Adrian and I'm an engineer at Apple.
visionOS allows you to bring people to new worlds and create rich spatial applications. Some existing spatial apps require an external device, such as a PC. Or they're built with alternative technologies like OpenXR. Now there's a new way to enhance these apps for Apple Vision Pro.
It's called Foveated Streaming! Foveated Streaming helps Apple Vision Pro connect to external devices, like a PC, to stream OpenXR content.
visionOS automatically sends input data, like hands, controller positions, and microphone. And the device streams your OpenXR content as video and audio.
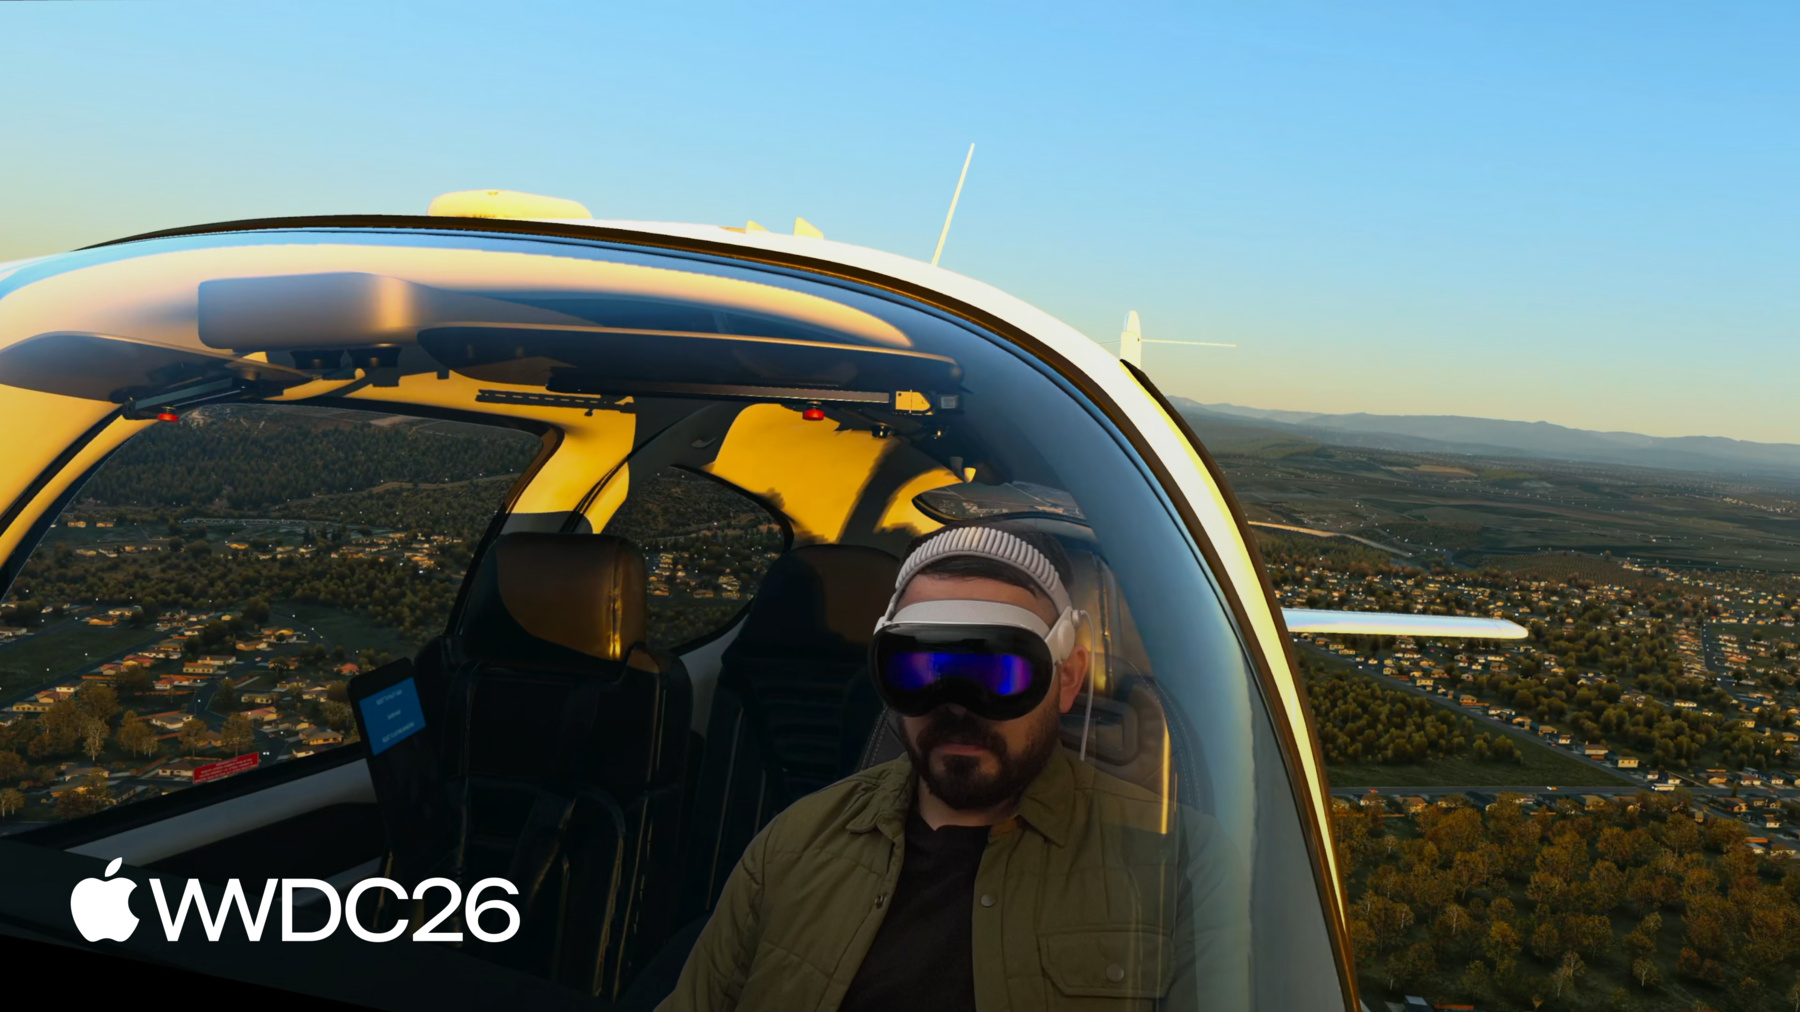
We introduced the Foveated Streaming framework in visionOS 26.4 and developers have already created some amazing experiences with it. For example, X-Plane 12 from Laminar Research brings a premium flight simulation experience to Apple Vision Pro. The X-Plane app on visionOS uses ARKit to understand your space and equipment, and streams the simulated experience from a PC. It feels incredible to interact with a physical flight simulator while fully immersed in the virtual world. You can look around the cockpit, or out the side windows. visionOS seamlessly blends the real and the virtual to deliver an immersive and effective simulation.
iRacing, a motorsport racing game for PC, delivers an incredible sim racing experience on Apple Vision Pro.
The iRacing Connect app uses ARKit hand tracking to match the position of your physical racing wheel with the virtual cockpit. So, you can see your hands holding the virtual wheel! And Innoactive brings Autodesk VRED to Apple Vision Pro. This enables designers and engineers to visualize massive 3D assets and simulations.
In this video, designers at Kia use this technology to see their cars at one-to-one scale, and in rigorous detail. So, Foveated Streaming already enables some fantastic experiences on Apple Vision Pro. And the video quality is incredible, because our system intelligently optimizes the video stream.
Foveated Streaming compresses video based on where a person is looking. We use the eye tracking technology in Apple Vision Pro to stream things you're focused on in higher detail. This sophisticated stream processing is built in to visionOS, so we've done the heavy lifting for you. It all happens so quickly that you don't even notice! Under the hood, visionOS comes with NVIDIA CloudXR™ streaming, built-in. This means that your immersive content is streamed with a high performance streaming protocol and with minimal latency. CloudXR™ is so performant that you can stream immersive content without any cables attached, over Wi-Fi. It can stream content from a local PC over your home network, or from the cloud.
Your apps can also integrate with native visionOS frameworks. So you can build user interfaces with SwiftUI, you can mix your content and the real world with ARKit, and you can combine on-device RealityKit rendering with your streamed content. It's super easy to use. We've found that you can start streaming your OpenXR application in just one day. And in a week, you can enhance your application with capabilities that you can only find on visionOS. So let's talk all about it! First, I'll describe how Foveated Streaming works, and show you how to get started in just a few hours.
Next, we will set up a visionOS app to display the streamed content.
Then we'll set up your OpenXR client so that it can stream to Apple Vision Pro. And finally, I'll talk about how you can enhance your application with capabilities only possible on visionOS.
So let's get started! Here is a block diagram that outlines the frameworks you will build on. Both for visionOS and for your streaming endpoint. Your OpenXR app should implement Apple's Foveated Streaming Protocol, which manages pairing with the device.
Also, your app should use the OpenXR runtime provided by the NVIDIA CloudXR™ SDK.
On visionOS, your app uses the FoveatedStreaming framework to connect to the streaming endpoint.
And you can integrate with other visionOS frameworks such as ARKit, SwiftUI, and RealityKit.
Let's begin by setting up your Streaming endpoint. We've provided an open source, end to end example on Apple's Github page.
Our windows sample code contains a reference implementation of Apple's Foveated Streaming Protocol. We have also provided an example OpenXR application and helpful guides to help you set up the NVIDIA CloudXR™ runtime.
So to get started, check out our Github page. And feel free to copy our reference implementation! This can help you set everything up in an afternoon. Next, let's talk about how to build a visionOS receiver app.
The visionOS app you create welcomes people into your experience.
It uses the FoveatedStreaming.framework to connect to streaming endpoints.
And most importantly, it adds unique features to your experience by leveraging the great frameworks in visionOS.
To get started, download our visionOS sample on developer.apple.com. You can use our sample code, both for visionOS and for Windows, to get your application streaming in an afternoon.
For the remainder of the talk, I'll dig into how these samples work. To begin, let's talk more about the receiver app. The Foveated Streaming framework uses a session-based API. So your app should create a FoveatedStreamingSession.
When you call connect, the framework will automatically present a list of endpoints your app can connect to. Apple Vision Pro must pair with your endpoint before beginning the stream. To do this, the endpoint presents a QR code with pairing information. We'll talk more about how to properly present this later. When the code is on screen, the framework automatically presents a user interface to scan. You scan the code by looking at it. Once you're connected, it's time to present the streamed content. You can do this with SwiftUI.
On visionOS, you present spatial content with an ImmersiveSpace. If you pass a FoveatedStreamingSession to your ImmersiveSpace, it will include the streamed content.
You can add additional windows, just like any other SwiftUI application. For example, our sample app adds a window to the scene to pause and resume the session.
It also adds views to the ImmersiveSpace itself, like this widget to re-open the main window.
And finally, it configures the immersive space to have a progressive immersion style. Progressive immersion is a great fit for Foveated Streaming. It allows people to view your experience through a portal, grounded in their physical environment. In fact, you have access to all of SwiftUI's features when using Foveated Streaming. So your streaming client can use native spatial gestures, and the visionOS look and feel.
You can add SwiftUI windows to your app, including volumetric windows. And you can use immersion styles, like progressive immersion. If you're new to SwiftUI, there are a ton of resources to help you get started. I like the talk "Get started with building apps for spatial computing" from WWDC23. Now let's look at what your streaming endpoint needs to do to integrate with Foveated Streaming. I mentioned before that your OpenXR app needs to do two things.
First, it should implement the Foveated Streaming Protocol, which handles authentication and pairing.
Second, it should use the OpenXR runtime provided by the NVIDIA CloudXR™ SDK.
Let's begin by talking about the Foveated Streaming Protocol. This is a lightweight, TCP-based connection which is established separately from the streaming connection. It helps to authenticate the secure foveated stream. It also communicates session state between visionOS and the endpoint. For details on the protocol format, see our article on developer.apple.com.
We've also provided a reference implementation of the protocol on our Github page, so you can use that to get started.
For example, here's what happens when your app calls connect().
Endpoints become visible to your local network with Bonjour.
When someone selects it, visionOS establishes a connection.
Then, pairing occurs. And once that's done, the stream begins, and connect() returns.
Let's dive in to the specific messages that are sent and received during barcode pairing. Messages in the Foveated Streaming Protocol are JSON-encoded. The protocol uses a request-acknowledge pattern. First, visionOS requests a connection, and if unpaired, it requests a pairing barcode. The barcode is also JSON-encoded.
It contains two things: a client token, and a hash of the secure connection's certificate. Both of these are provided by the NVIDIA CloudXR™ SDK.
visionOS will update your endpoint on the session status.
And once the endpoint reports the content is ready, streaming begins.
It's important that you monitor the session status to have a stable user experience.
For example, when you take off the device, it goes to sleep.
Just before, it informs your endpoint that the streaming session is paused.
While asleep, all connections are severed.
You should keep the endpoint available so that someone can reconnect when they put the device back on. Now, let's talk about how NVIDIA CloudXR™ integrates with your OpenXR client. NVIDIA CloudXR™ provides an OpenXR runtime for windows. Your OpenXR application automatically connects to this runtime, and CloudXR™ handles the streaming details.
CloudXR provides visionOS input data to OpenXR automatically. For example, you can use the OpenXR extension for hand tracking.
PlayStation VR2 Sense Controllers also pass through.
We recommend using a depth buffer for the best experience. Also, provide an alpha channel to mix your content with the user's surroundings. For more information, see our article on developer.apple.com. You can also consult our sample code on Github to understand how to set up NVIDIA's runtime. Now that you have everything set up, let's talk about how to evaluate the performance of your streamed experience. We've provided an instrument in Xcode to measure statistics of the stream. The Foveated Streaming instrument informs you about the stream's bandwidth, pose latency, frame rate, and more. You can use this to diagnose issues with the streamed content.
To learn more, see our article on developer.apple.com. Now that you have your streaming client up and running, I'll talk about some ways that you can enhance the experience with features you can only find on visionOS.
As we've seen, your streaming experience is composed of two apps: the receiver app on visionOS and the host app on your streaming endpoint.
The Foveated Streaming framework allows them to communicate with the message channels API.
On visionOS, message channels are an API on FoveatedStreamingSession.
And CloudXR provides an OpenXR extension for message channels.
These messages are completely Opaque Data blobs, so you can send whatever you want! For example, you can present a SwiftUI interface to select a level in your game, and send a command to the OpenXR application to initiate the load.
And while it's loading, the OpenXR app can report its progress.
Or, your visionOS app can send ARKit data, to align the scene in the users's real space.
X-Plane 12 is a great example of this. The visionOS app uses ARKit to find the location of a physical flight simulator. It uses message channels to sync this to the PC, so the real and the virtual are perfectly aligned.
It's easy to use ARKit and message channels to enhance your OpenXR experience. FoveatedStreamingSession offers an API to convert between OpenXR and ARKit coordinate frames. As a reminder, controller and hand tracking are already built in! And use an alpha channel, to blend your content with a person's environment. You can also compose your streamed content with native RealityKit rendering! To do this, simply add a RealityView to your ImmersiveSpace. RealityKit content seamlessly composes with your streamed content. And if you supply depth to your OpenXR scene, the content will even occlude each other! And that concludes our session. I invite you to download and review our sample code, which makes it super easy for you to get started. Try to set up your own receiver app, and integrate your OpenXR client with our protocol.
Have fun, and enjoy the rest of WWDC!
-
-
6:03 - Connect to a streaming endpoint
// Connect to a streaming endpoint import SwiftUI import FoveatedStreaming struct ConnectView: View { let session: FoveatedStreamingSession var body: some View { Button("Connect") { Task { try await session.connect() } } } } -
6:44 - Display a Foveated Streaming session in your immersive space
// Display a Foveated Streaming session in your immersive space import SwiftUI import FoveatedStreaming @main struct FoveatedStreamingSampleApp: App { private let session = FoveatedStreamingSession() var body: some SwiftUI.Scene { ImmersiveSpace(foveatedStreaming: session) } } -
6:55 - Compose SwiftUI content with Foveated Streaming
// Compose SwiftUI content with Foveated Streaming import SwiftUI import FoveatedStreaming @main struct FoveatedStreamingSampleApp: App { private let session = FoveatedStreamingSession() private let appModel = AppModel() var body: some SwiftUI.Scene { Window("Main", id: appModel.mainWindowId) { ContentView(session: session) .environment(appModel) .environment(session) // ... } ImmersiveSpace(foveatedStreaming: session) { SpatialContainer { ReopenMainWindowView().environment(appModel) TransformStreamWidgetView().environment(session) } } } } -
13:42 - Compose RealityKit content with Foveated Streaming
// Compose RealityKit content with Foveated Streaming

import SwiftUI
import RealityKit
import FoveatedStreaming

@main struct FoveatedStreamingSampleApp: App {
    private let session = FoveatedStreamingSession()
    private let appModel = AppModel()

    var body: some SwiftUI.Scene {
        ImmersiveSpace(foveatedStreaming: session) {
            RealityView { content in
                // ...
            }
        }

    }
}
-
-
- 0:00 - Introduction
Overview of Foveated Streaming — a new framework in visionOS 26.4 that lets Apple Vision Pro connect to a PC and stream immersive OpenXR content with eye-tracking-based video optimization.
- 4:08 - How Foveated Streaming works
Learn the architecture: the visionOS receiver app uses the FoveatedStreaming framework, the streaming endpoint implements the Foveated Streaming Protocol, and NVIDIA CloudXR handles the OpenXR runtime and Wi-Fi/cloud streaming.
- 4:46 - Set up the streaming endpoint
Set up your Windows streaming endpoint using open-source sample code on GitHub, which includes a reference implementation of the Foveated Streaming Protocol and an example OpenXR application.
- 5:18 - Create a visionOS receiver app
Build your visionOS receiver app using FoveatedStreamingSession to connect and pair with the endpoint, present streamed content in an ImmersiveSpace, and enrich the UI with SwiftUI windows and progressive immersion.
- 8:02 - Integrate with the streaming endpoint
Configure your OpenXR client with the Foveated Streaming Protocol for authentication and pairing, and integrate the NVIDIA CloudXR runtime to handle input data, hand tracking, depth buffers, and alpha channel compositing.
- 11:28 - Measure performance
Use the Foveated Streaming instrument in Xcode to measure your stream bandwidth, pose latency, and frame rate, and diagnose performance issues before shipping.
- 11:56 - Enhance with visionOS features
Enhance your app with message channels to exchange data between the visionOS and OpenXR apps, ARKit to anchor virtual content to the physical world, and RealityKit to composite native 3D objects alongside the streamed content.
- 13:56 - Next steps
Download sample code on GitHub and developer.apple.com to get started, set up your own receiver app, and integrate your OpenXR client with the Foveated Streaming Protocol.