-
Compose advanced graphics effects with SwiftUI
Discover how to craft rich, custom experiences by creatively composing SwiftUI layout and graphics APIs. We'll show you how to break down complex designs and use a creative pipeline to chain simple building blocks together. Learn how to draw with layer shaders, animate with timelines, and anchor views with alignment guides.
Chapters
- 0:00 - Introduction
- 1:40 - Design breakdown
- 4:11 - Cover art and shader effects
- 11:07 - Driving animation with time
- 12:00 - Time-synced transcript view
- 13:18 - Floating timestamps with alignment guides
- 16:16 - Creative pipelines
- 17:13 - Next steps
Resources
Related Videos
WWDC24
-
Search this video…
Hi! I am Haotian, an engineer on the UI Frameworks team. Since its inception, SwiftUI has been steadily growing with its capabilities in graphics and layout, making it the choice for people who want to ship rich and custom experiences on Apple devices. Apple uses SwiftUI to build advanced effects across its own apps, too. Well, the word advanced can sound intimidating. But here's the thing, even with advanced effects, SwiftUI apps share the same basic elements. It is like a pipeline.
Data flows through a series of standard pipes. It takes something in, transforms it, and passes it along. SwiftUI's progressive disclosure means each pipe already works on its own. But you can connect them, create branches, or merge the flows. That's when you get creative. The 'advanced' lies in the construction, not the complexity. Here's the roadmap. First, I will take a design and break it apart. Then I will build advanced effects. And finally, I will share how you can incorporate these techniques in your apps, using a creative pipeline. Here is a design I am building.
So, I have been building my own podcast app. This is what it currently looks like, a bare-bones transcript view. And I am going to make it fancy, like the live lyrics view in Apple Music. With animated cover art and transcripts that scroll in sync with time. How do I even start? I start with what I already have. My existing user interface already contains all the data I need, including the cover art, the playback info, and the transcript text. The question isn't what data I need, it's how I transform it using the pipeline. Here are a couple of examples.
Starting with the cover art, I need a pipe that converts the image into a visualizer, and the shader pipe fits here.
The visualizer needs to be in motion to reflect our playback state. For dynamic visuals, I connect the time pipe to the pipeline, that is two pipes merged into one.
Well, the time pipe can do more than that. The transcript pipe was transformed to have timestamp overlays, but it does not know about the current time and therefore cannot scroll correctly.
I can connect the same time pipe to form a pipeline of time-synced scrolling text. And now I have dynamic visuals for the background, and a scrolling transcript for the foreground. Time to connect those two parallel pipes together. And if you zoom out, you realize that every modifier, every API, is another stage in the pipeline. It just flows.
Just like what was shown, my podcast app contains advanced layout and graphics. I have a full-screen cover art, applied with shader effect, and time-driven animation. On the other front, I have a time-synced scrollable transcript view, refined with floating-view attachment! I will go through each of those and explain how to achieve them, starting with the cover art.
Here's our raw material. A cover art image.
The cover art is beautiful but it's going to sit behind the transcript. I soften it with a .blur modifier so it doesn't compete.
Now that my cover art is blurred, next, I will apply some shader magic. You might ask, what is a shader? And how different is it from writing SwiftUI code? Let me explain.
This icon here starts as vector, then it was rasterized by GPU to pixels.
At this point, I can run a program on GPU called shader to decide which color to fill in those pixels.
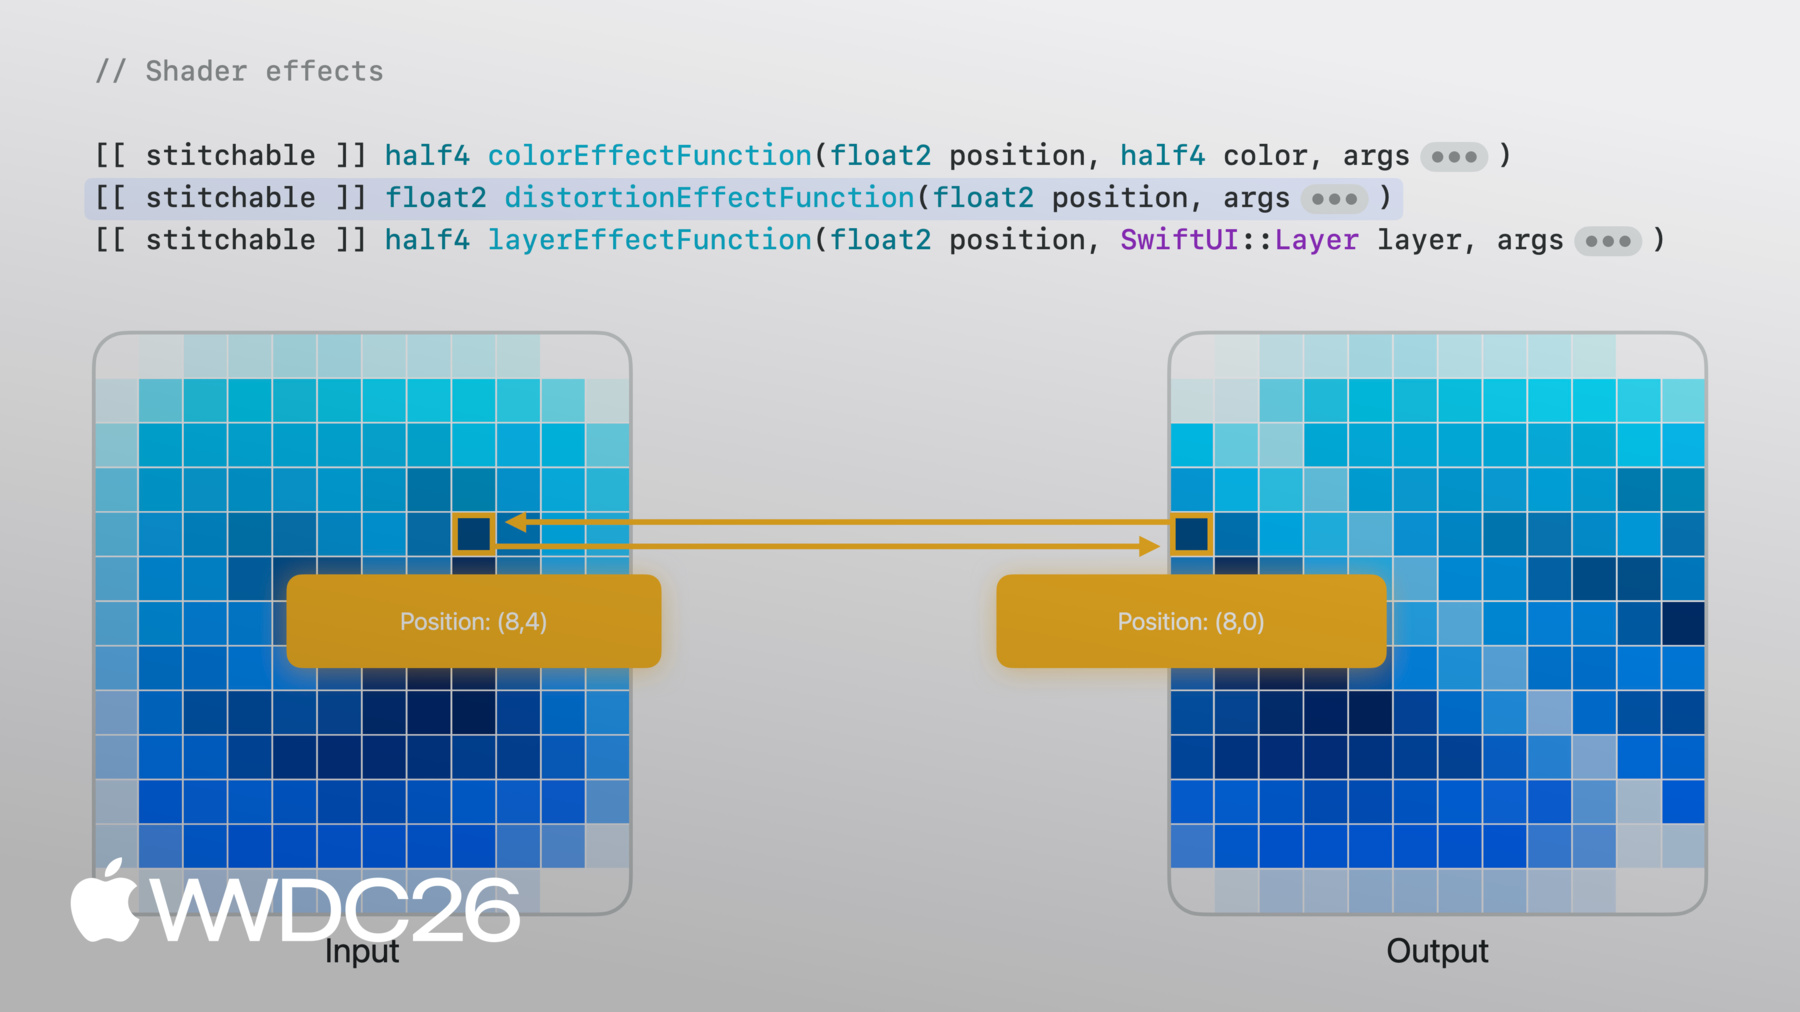
The shader function runs in parallel. Each pixel executes independently, with no awareness of its neighbors. Knowing that, it will make perfect sense how Metal shader can be called from SwiftUI's shader effect APIs. There are three types of shader effects. Each has different method signature, certain parameters are required, although you can also append additional ones for the information you want to forward from SwiftUI to shaders.
colorEffect works by transforming each pixel's color to a new color, where each pixel is provided with the pixel position and the original view's pixel color at that position. You then return a new color based on that information. This is useful for simple effects like turning a colored image into a black and white one.
distortionEffect works differently. Instead of expecting a color on a certain position, distortionEffectFunction takes the existing position for a new position that SwiftUI will sample from the original image. There is no pixel color involved, you tell SwiftUI 'I want this position's color to follow that position's color'. This is useful for geometric effects like the sheer effect shown here.
layerEffect is the most flexible. The layerEffectFunction still works per pixel, but it provides the layer of the entire view, which allows you to sample adjacent pixels or the entire region. This is useful for effects like blur where the output pixel color depends on multiple input pixels.
For my use case, distortionEffect works, but layer effect provides the most flexibility. I'll add a layerEffect modifier, then I will add a shader function called backgroundWarp.
For now it just samples from the original layer at the given position, which gives me back the same image. But now I have a shader function I can build on.
With layerEffect, I can sample anywhere from the original view. For example, I can pass a float2 vector to the shader function, and use it to offset the sample position in the shader.
To match with the function parameters, I now put a float2 vector from the SwiftUI side.
Now as I increase the offset, each pixel runs the shader with this offset value and so they all uniformly and increasingly sample from a distance.
And as I decrease offset to zero, the image goes back.
Still, because of the uniform offset, I only get the shifted pixels in a fixed pattern. I need something more organic, something that varies per pixel.
For organic variation, I use a NoiseTexture, a pre-computed image of smooth, random values.
This time, on the SwiftUI side, I pass the view size alongside the NoiseTexture as an image parameter.
And on the Metal side, the image arrives as texture2d.
Now I am about to show some really metal Metal code.
I first use the current pixel position and the size to get the uv value, which stands for where I am relative to this image, it allows me to sample textures without an absolute position.
Now I'll unpack the NoiseTexture.
It has RGB channels, the red and green channels are interesting because each one contains a different noise pattern.
If I move my uv, I get different red and green values. This pair of constantly changing values happen to be a good fit for our organic offset in X and Y since it is different per pixel.
Now come back to the Metal shader.
I create a sampler with repeat mode so it tiles, then I sample the noise at each pixel's UV position. The red and green channels give me a two-dimensional offset, which I scaled and added to the position to sample from the original view. Now, the shader twists the image slightly.
That was per-pixel variation, but I want something richer.
So I experiment, what if, instead of one noise sample, I do it twice. The first gives me an initial offset. Then I sample the noise again, but this time at a position shifted by the initial offset, and just like that, I get these organic, flowing blobs.
This layered noise approach is a well known technique called domain warping. To explore how I did it, download the sample app, it even has a preview so you can play with the parameters as you want.
Now I have a cool shader effect, but it's still frozen. I need to make it move. That's where time comes in.
Different from SwiftUI's transaction-based animation, shaders are stateless. They have no memory of the previous frame, the output relies only on the parameters. So, if I want animation, I need to pass in a value that changes over time.
TimelineView is exactly the pipe that I need to connect. With the animation schedule, it fires every frame with a timestamp. I pass that timestamp into the shader, add it to the position to sample from noise, and the pattern starts flowing.
That was shader animation, driven by time. For my transcript view, I also need to add time to the mix, so that the current running transcript line will be highlighted and centered in the scroll view.
Here's my transcript. Text views in a LazyVStack inside a ScrollView. Each line is its own view, familiar SwiftUI. Now I need to make it follow the playback state.
I use the playback timestamp to determine which line is current. The current line is bold and clear, the rest fades back. And with the onChange modifier to monitor the current line change, I scroll to keep the current line centered.
I have got my time-synced scroll view working. Now, I want to focus on the small timestamp on the current line. Every line has a timestamp in its overlay, but only the one for the current line is visible. This way, it doesn't interfere with the layout. It's always there, just waiting to be shown.
Let's focus on this one row, a sub view, attached on the edge of its container. How do I get it there? The offset modifier cannot do it without knowing the size of both views.
First, let's talk about alignment. Every view has alignments. Think of it as the point the layout system uses to position the view, and it is defined by both axes.
When I place the sub view in the overlay container, the layout system aligns them using the default center alignment.
Think of it like a pin punching through both views, so it holds them together at each view's alignment point.
I change the overlay's alignment to .bottomLeading.
Now the pin goes through the bottom leading point of each view and they lock together there.
Right now, the layout system asks for the bottom leading alignment, and so the subview returns its bottom leading point to punch through.
If I were to explicitly express this in code, I would write an alignment guide here to mean bottom is bottom.
Now, remember the goal is that the subview's top edge should touch the bottom edge of the container.
What if, I tell the subview that, when the layout system asks about the bottom alignment, don't use the default one. Instead, I have a custom override that moves the bottom alignment to the top edge.
And now, when the pin comes to punch through, it follows that point instead.
I get the result by just writing a purely semantic override without manually offsetting the view. There's more to this API. I can define my own custom alignments, and the closure gives me ViewDimensions so I can compute point from the view's actual size. Check out the documentation on "SwiftUI Alignment" for the full picture.
And here it is. The bare-bones transcript view I started with, now with an animated background driven by a shader and time, a transcript that scrolls in sync with playback, and a floating timestamp positioned with alignment guides.
All from the simple pipes, composed together, and it works across Apple devices.
Let's step back. I took a design, broke it down into layers, and for each layer I found the right API to turn raw data into views. Each stage's output fed the next stage's input.
Connecting stages like this is what I called a creative pipeline. But those were the choices I made for this podcast app. For your own app, the pipeline can get even more creative. The inputs could have been gyroscope data instead of audio. The shader could have been a ripple instead of a twist. The foreground could have been a freeform canvas instead of a scroll view. Every combination gives you something different. That's the creative part, the APIs are the same. What you feed in and how you connect them, that's yours.
So go make it your thing. Download the sample project and experiment with the shader, change the noise, tweak the speed, try a different image. Look for opportunities in your own app where a small visual effect could make a big difference. And when you start connecting those pipes together, you'll be surprised how quickly something simple becomes something advanced.
Thank you for watching, and goodbye!
-
-
4:18 - Cover art image
Image("CoverArt") -
4:24 - Blurred cover art image
Image("CoverArt") .blur(radius: 30) -
7:09 - Applying layer effect in SwiftUI
GeometryReader { proxy in CoverArtView() .layerEffect( ShaderLibrary.backgroundWarp(), maxSampleOffset: .zero ) } .ignoresSafeArea() -
7:21 - Writing layer effect shader in Metal
[[stitchable]] half4 backgroundWarp( float2 position, SwiftUI::Layer layer ) { return layer.sample(position); } -
7:39 - Metal shader with offset parameter
[[stitchable]] half4 backgroundWarp( float2 position, SwiftUI::Layer layer, float2 offset ) { return layer.sample(position + offset); } -
7:55 - SwiftUI layer effect with offset parameter
GeometryReader { proxy in CoverArtView() .layerEffect( ShaderLibrary.backgroundWarp( .float2(.init(x: 0, y: 0)) ), maxSampleOffset: .zero ) } .ignoresSafeArea() -
8:04 - SwiftUI layer effect with full-width offset
GeometryReader { proxy in CoverArtView() .layerEffect( ShaderLibrary.backgroundWarp( .float2(.init(x: proxy.size.width, y: 0)) ), maxSampleOffset: .zero ) } .ignoresSafeArea() -
8:37 - SwiftUI layer effect with noise sampling
GeometryReader { proxy in CoverArtView() .layerEffect( ShaderLibrary.backgroundWarp( .float2(proxy.size), .image(Image("NoiseTexture")) ), maxSampleOffset: .zero ) } .ignoresSafeArea() -
8:55 - Metal shader with noise sampling
[[stitchable]] half4 backgroundWarp( float2 position, SwiftUI::Layer layer, float2 size, texture2d<half> noiseTex ) { constexpr sampler s(address::repeat, filter::linear); float2 uv = position / size; half4 n = noiseTex.sample(s, uv); float2 offset = (float2(n.r, n.g) - 0.5) * 200.0; return layer.sample(position + offset); } -
10:22 - Metal shader with domain warping
[[stitchable]] half4 backgroundWarp( float2 position, SwiftUI::Layer layer, float2 size, texture2d<half> noiseTex ) { constexpr sampler s(address::repeat, filter::linear); float2 uv = position / size; half4 n = noiseTex.sample(s, uv); float2 q = float2(n.r, n.g); n = noiseTex.sample(s, uv + q); float2 offset = (float2(n.r, n.g) - 0.5) * 200.0; return layer.sample(position + offset); } -
11:16 - SwiftUI layer effect with static visual
GeometryReader { proxy in CoverArtView() .layerEffect( ShaderLibrary.backgroundWarp( .float2(proxy.size), .image(Image("NoiseTexture")) ), maxSampleOffset: .zero ) } .ignoresSafeArea() -
11:37 - SwiftUI layer effect with animated visual
@State private var startDate = Date.now TimelineView(.animation) { timeline in let elapsed = timeline.date.timeIntervalSince( startDate ) CoverArtView() .layerEffect( ShaderLibrary.backgroundWarp( .float2(proxy.size), .image(Image("NoiseTexture")), .float(elapsed) ), maxSampleOffset: .zero ) } -
12:15 - Basic transcript view
ScrollView { LazyVStack(alignment: .leading, spacing: 12) { ForEach(sampleTranscript) { line in .font(.title) .fontWeight(.bold) } } } -
12:33 - Time-synced transcript view
@State private var playback = PlaybackState() ScrollViewReader { scrollProxy in ScrollView { LazyVStack(alignment: .leading, spacing: 12) { ForEach(sampleTranscript) { line in Text(line.text) .transcriptLineStyle(isCurrent: line.id == playback.currentLineIndex ) } } } .onChange(of: playback.currentLineIndex, { _, i in scrollProxy.scrollTo(i, anchor: .center) }) } -
13:53 - Overlay with center alignment
Text(line.text) .overlay { Text(line.formattedTimestamp) } -
14:06 - Overlay with bottom leading alignment
Text(line.text) .overlay(alignment: .bottomLeading) { Text(line.formattedTimestamp) } -
14:32 - Overlay with alignment guide override
Text(line.text)
     .overlay(alignment: .bottomLeading) {
          Text(line.formattedTimestamp)
              .alignmentGuide(.bottom) { $0[.top] }
     }
-
-
- 0:00 - Introduction
A way of thinking about advanced graphics and layout in SwiftUI as a creative pipeline — a series of stages that take data in, transform it, and pass it along.
- 1:40 - Design breakdown
Take a finished design and decompose it into pipeline stages. Working from a podcast app's existing UI — cover art, playback info, transcript text — see how each piece can be transformed and connected: a shader pipe converts cover art into a visualizer, a time pipe drives motion, and another time pipe syncs transcript scrolling.
- 4:11 - Cover art and shader effects
Soften the cover art with a blur, then layer on shader effects. Learn how shaders run per pixel on the GPU and how SwiftUI exposes them through three modifiers — color, distortion, and layer effects — each with different inputs and trade-offs. Build a layer-effect 'background warp' shader that samples a noise texture for organic, per-pixel offsets.
- 11:07 - Driving animation with time
Shaders are stateless — for animation, time has to come from outside. Use TimelineView to fire every frame with a timestamp, pass it into the shader, and watch the warp pattern flow as time advances.
- 12:00 - Time-synced transcript view
Build the foreground transcript using Text views in a LazyVStack inside a ScrollView. Use the playback timestamp to highlight the current line and fade the rest, then use onChange to scroll the current line to center as playback progresses.
- 13:18 - Floating timestamps with alignment guides
Position a small timestamp on the edge of the current line without resorting to manual offsets. Walk through how SwiftUI's alignment system pins views together at their alignment points, then use alignmentGuide to override an alignment semantically — moving the subview's bottom guide to its top edge so it floats neatly outside its container.
- 16:16 - Creative pipelines
Step back and see the pattern: each stage's output becomes the next stage's input. The same approach extends beyond this podcast app — swap audio for gyroscope data, a twist shader for a ripple, or a scroll view for a freeform canvas — to compose your own advanced effects.
- 17:13 - Next steps
Download the sample project, experiment with the shader, and look for opportunities in your own app where a small visual effect could make a big difference.